So this week is our final time to work on our tea boxes. We have spent the better part of two months working up to this moment and now it's time to work on new things. Here are my results of our final photos.
Craft: For this assignment, like last week, did not use Adobe Illustrator or software, but instead, we used DSLR camera, portable lighting system and props to create these images. We used the light system which consisted of a halogen bulb affixed to a mobile with an umbrella attachment as well as props that we gathered.
Composition: What we did was utilize a DSLR camera, a Canon Rebel-series to capture our objects and mobile lighting fixtures to control the lighting. This assignment, we gathered props such as my South Vietnamese Flag, our tea boxes and equipment to construct visually interesting and effective archival evidence. We first placed our tea boxes, one in a series of photos and all three in another. We then added props to another group of photos. Placing our cameras on tripods and adjusting our lighting, we then took the photos to have our best depth of field. Afterward, we transferred the camera raw files onto our flash drives and converted them to png to upload.
Concept: The concept of this was to capture evidence of the tea boxes in an interesting and professional manner. Like other projects we needed evidence of our works and this was our cause. We used cameras to capture what we did and try, with moderate success, to capture interesting compositions.
So this week, we were charged with photographing our final tea boxes. After a month of working on tea boxes, drafting them by hand then in Illustrator, designing their appearance, followed by cutting them either by hand or an automatic paper cutter. Now that the project is completed, we began the process of cataloging them and preserving them in photography in a professional and logical way. Here are our results.
Craft: For this assignment, unlike the previous weeks, did not use Adobe Illustrator or software. We didn't even use any cutting or measuring tools. What we used instead was a DSLR camera, portable lighting system and props to create these images.
Composition: What we did was utilize a DSLR camera to capture our objects and mobile lighting fixtures. This assignment, we gathered props such as my South Vietnamese Flag, our tea boxes and equipment to construct visually interesting and effective archival evidence. We first placed our tea boxes, one in a series of photos and all three in another. We then added props to another group of photos. Placing our cameras on tripods and adjusting our lighting, we then took the photos. Afterward, we transferred the camera raw files onto our flash drives.
Concept: The concept of this was to capture evidence of the tea boxes. Like other projects we needed evidence of our works and this was our cause. We used cameras to capture what we did and try, with moderate success, to capture interesting compositions.
A few days ago, we had an open reception to a remarkable artist here at the Art. Leslie Baum is an artist as well as an educator in the fine arts bringing with her years of experience both teaching and creating art. Her unique style includes incorporating other works of art from classical artists as inspiration as she creates a unique construct. The unique aspect of the gallery that drew my attention was where the art was situated. During her artist talk, she discussed how she wanted to move away from the tradition and conventional wisdom of placing art on the walls and instead had it on the floor as a huge tapestry of canvas that covered the floor of the gallery. This was her results.


Craft: Leslie utilized flat canvas sheets around 3x5 in dimensions. This canvas, she would have washed and dried prior to use. The paints she used were a type of acrylic paint that I do not seem to remember but it was a first time for her with that particular media. Brushes of, I assume, large size were utilized in the making of this massive piece.
Composition: The piece that so captured my attention was first constructed from flat sheets of canvas that Leslie washed and dried, most likely to remove any particles that may affect the painting process. Following that, she would then paint each individual canvas, using several other works of art by other artists as inspiration. She used a type of acrylic paint that I cannot remember. After that, she would then combine the pieces into a quilt-like structure on the floor.
Concept: Conceptually, it is something I have not seen before, at least not something I remember. The concept behind this piece was combining pieces of nature that she enjoyed and making something of spring or warmth. For us, it was more than just a painting or series of them. It was a three-deminisional object. It was something we could interact with, sit on, step on, walk on. It went beyond the 2-D matrix of a framed painting and became part of the gallery itself. Design and function I often hear in class. This piece had both. It was designed to be a 3-D object for the viewer to interact with. That is why I believe was the reason we were suggested to go to this particular gallery opening.
This week was exhausting and laborious. We discussed our next project, designing a tea box. We had specific instructions on the layer designs and dimensions of the three objects, the tea box, tea bag container and tea bag tab. Like the previous weeks, we utilized Adobe Illustrator for drafting our shapes and used various shortcuts to add in pictures. These were my results.
Below
Box and Envelope designs

Final product
Composition: The previous weeks of using Adobe Illustrator and a Mac Desktop computer as well as a flash drive were played out this week. From what we did last time, we were lucky to just enhance our designs to make one cohesive unit. I decided to keep one design and brand and change up the art style.
Craft: The assignment required us to redesign the tea boxes and tea bag envelope and tea bag tab to form some kind of cohesion. The process began by first drafting the designs in Adobe illustrator by making the outline of the shapes, including the tabs, with the pen tool. With the grid of Illustrator up and snap to grid selected, I drafted as I had done in previous weeks but this time, the cut and folding lines were on separate layers. Following from that, I would create a third layer and copy and past the line layers into that third layer. Then I would click on the outer layer and click the "Draw inside" option. Copying an image, artworks of mine, I then pasted it and moved the image to its desired spot. On a new layer, I added text as was instructed. I did this process for all the designs. Afterward, I exported them as jpegs and saved.
Concept: The concept of these pieces was to create tea boxes and bags envelopes to form a collection of similar products. For that, I chose to keep a single design and brand and change the art style to form different tea brews in a series. By doing this, I was able to portray a commonality rather separation.
This week was exhausting and laborious. We discussed our next project, designing a tea box. We had specific instructions on the layer designs and dimensions of the three objects, the tea box, tea bag container and tea bag tab. Like the previous weeks, we utilized Adobe Illustrator for drafting our shapes and used various shortcuts to add in pictures. These were my results.
Below
Below
The Tea Bag Tabs.
Below
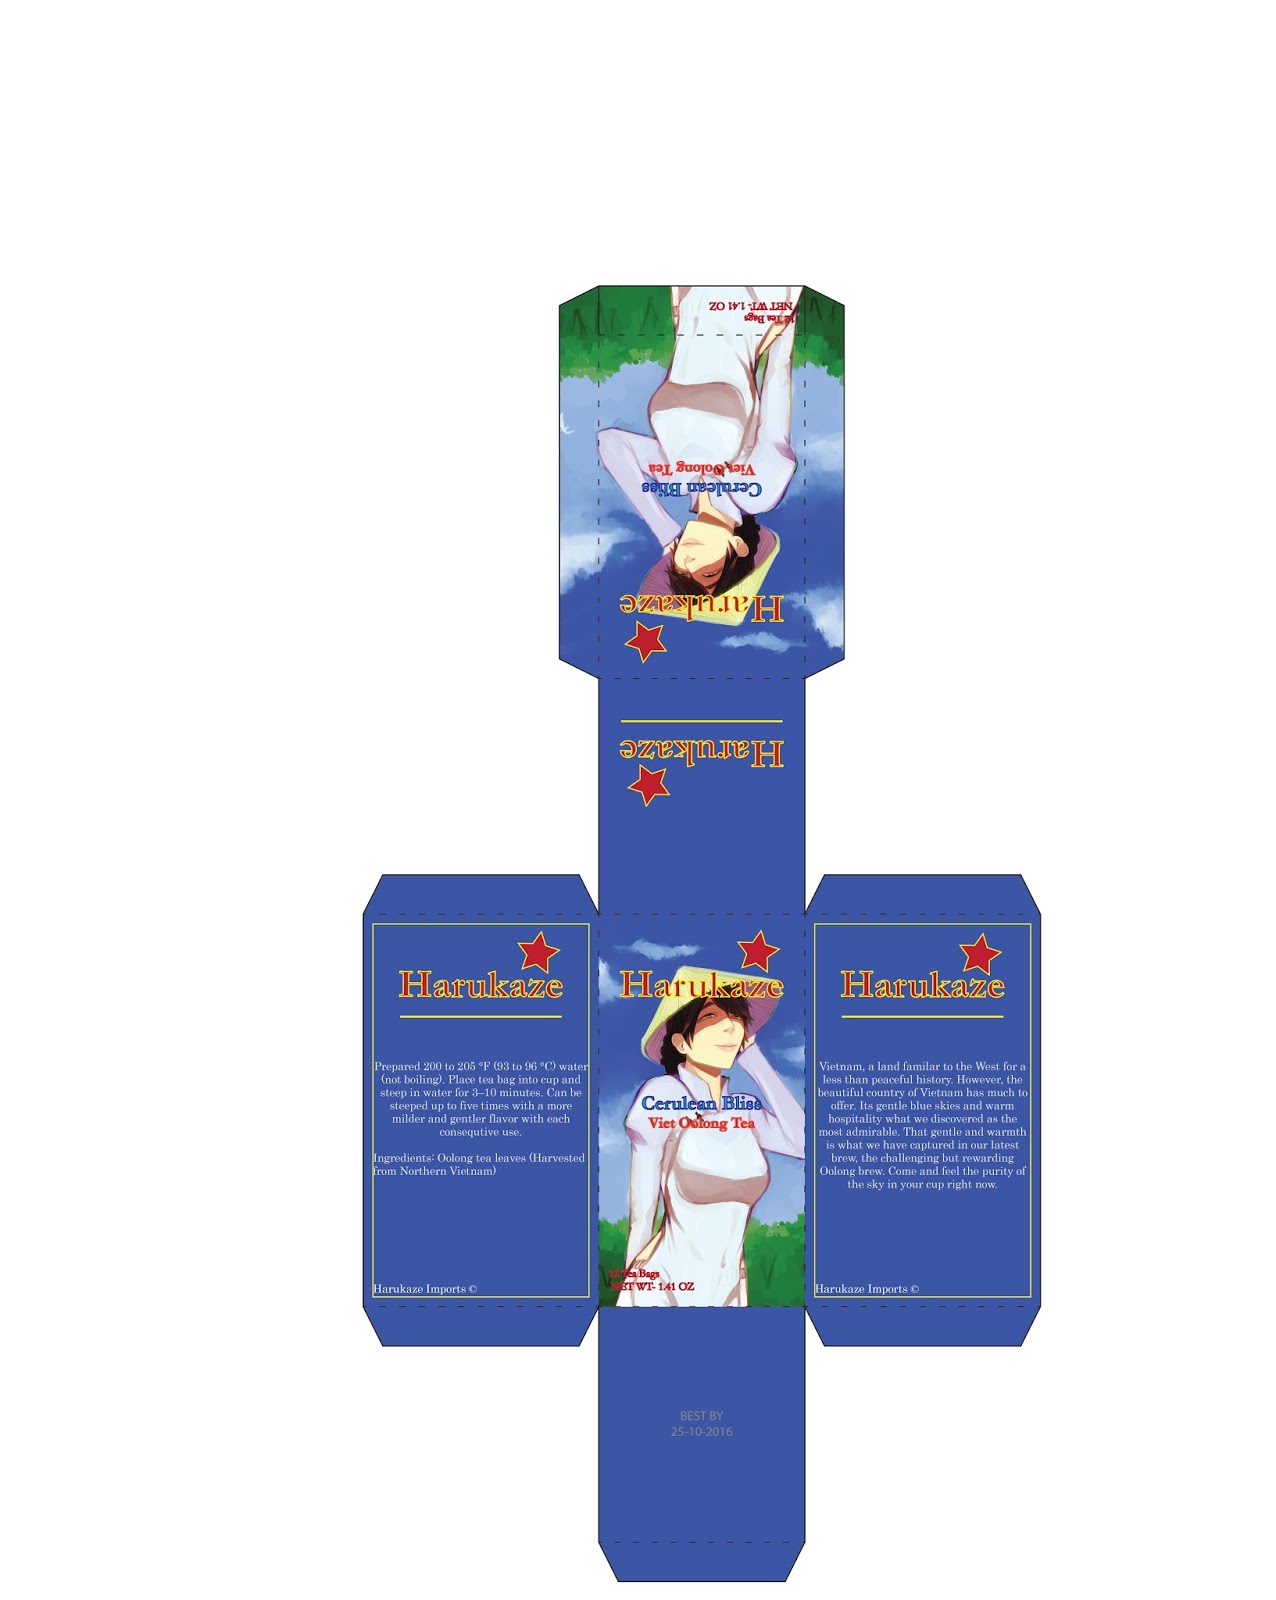
The Tea Box designs.
Composition: The materials I used to design these 3D shapes the same as the previous week, Adobe Illustrator and a Mac Desktop computer as well as a flash drive and the internet. Much like last week, the workflow of drafting these figures was very substantially quicker than physically drafting them but to envision the shape of the tea box to allow it within the dimensions that were assigned: 3x5x2 5/8 inches for the tea box, 1/4x2 5/8x3 inches for the tea bag container and 1x1 inches for the tea bag tab.
Craft: The assignment required us to create three different drafts, one for the tea box, the next for the tea bag envelope and the last for the tea bag tab. For each draft, we needed three different designs for them for a total of nine designs. It was laborious work in the beginning but once the workflow was achieved, it became much quicker. The process began by first drafting the designs in Adobe illustrator by making the outline of the shapes, including the tabs, with the pen tool. With the grid of Illustrator up and snap to grid selected, I drafted as I had done in previous weeks but this time, the cut and folding lines were on separate layers. Following from that, I would create a third layer and copy and past the line layers into that third layer. Then I would click on the outer layer and click the "Draw inside" option. Copying an image, artworks of mine, I then pasted it and moved the image to its desired spot. On a new layer, I added text as was instructed. I did this process for all the designs. Afterward, I exported them as jpegs and saved.
Concept: The concept of these pieces was to create tea boxes and dip our feet into the world of product design. While ours, especially mine, are rudimentary and amateur at best, it gave me the appreciation of just how much goes into designing a product's container or presentation. This coming week, we're cutting them out and seeing how it went. I look forward to it as always.


